Specialty Moving Services

How do we move pool tables, and why do some moving companies not include this in their services?
Pool tables require extra care and a little added knowledge on the part of movers. From over-stretching the felt to damaging the slate(s), and a generally high cost with most residential pool tables easily costing thousands of dollars, it’s no wonder this is a specialized service! For a simple answer, many moving companies don’t move pool tables because they do not have the expertise or proper equipment to do so. It’s not a typical piece of furniture that can be lifted as-is and carried out of the house to be placed on a moving truck. Leave it to the pros, we’re here to fill you in. Let’s go through the process so you know exactly what to expect and what happens on moving day!
Step 1 – Make space in the working area. We have to be able to fully maneuver around the pool table. This includes the path we’ll be taking it on to the moving truck once it is disassembled. Because they’re already large to begin with, we need extra space to be able to begin taking them apart.
Step 2 – Remove the rails. The bumpers, rails, and pockets can typically be taken down into 6 pieces. Usually, these are held in with bolts, and the pockets may have a few screws or staples holding them in place. Once the rails are removed and placed out of the way, you’re left with the felted slate top.
Step 3 – Remove the staples. This is certainly one of the longer steps, if not the longest. The felt is pulled over the sides and then stapled in. There are typically several dozen staples that have to be removed. The easiest method we’ve found is using a small flathead screwdriver to pry each staple up enough that you can then use a pair of pliers to get a bite on the staple and pull it out. Every single one has to be removed all around the pool table. Once complete, fold and roll up the felt then place it somewhere safe so it’s not ripped or torn while in transit.
Step 4 – Dismantle the slate(s). Pool tables commonly have a 3-piece slate, although there are also 2-piece and 1-piece slates. Whichever you have, it’ll be held in place by screws in preset holes on the surface. Sometimes the holes may be filled in with wax, in which case you’ll need to dig it out (we use a flathead or whatever’s clever). Once you’ve removed all the screws, bundle them up and set them to the side, making sure to keep them together with the rest of the hardware. The slate(s) should now be free and resting on the table frame. When dealing with a 3-piece, you want to keep the slates in the same order for reassembly. Some service providers number them, but we like to draw a connecting arch along all 3 slates, it’s Charlie’s “signature” along with a smiley face he always draws.
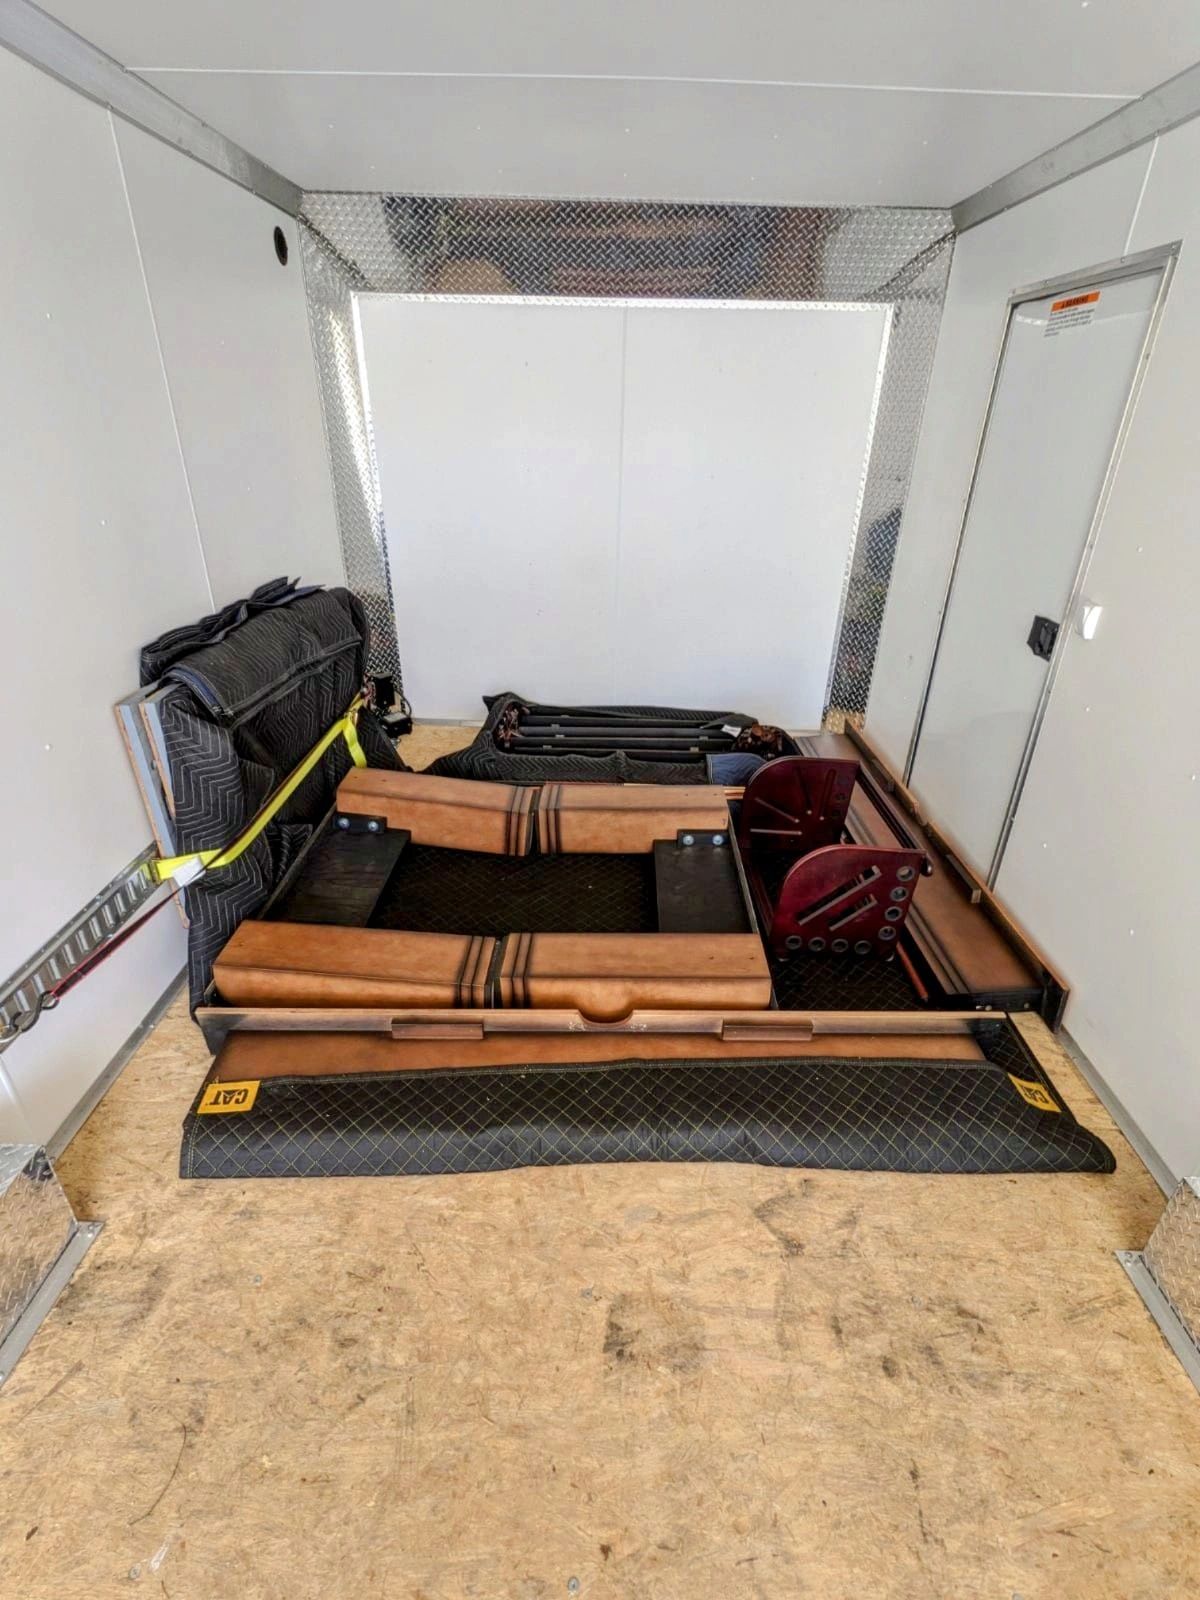
Step 5 – Heave Ho everything out to the truck. As you can see in the picture, we had to take apart the frame into segments on this particular service. Sometimes you can get away without doing it, sometimes you can’t. Do what’s safe and in a way that takes care of everything to prevent damage! Slate(s) should ALWAYS be carried vertically and never carried horizontally. It’s the safest way to keep the structural integrity of the natural stone. They should also be transported in the truck this way, with adequate padding under and around each one.
Step 6 – Get the frame in place at the new location. Once you’ve arrived at the new home, you’ll want to get the frame reassembled and in place with the client’s approval. It’s much easier to move only the frame around and get it positioned to their satisfaction before it’s fully assembled and heavy.
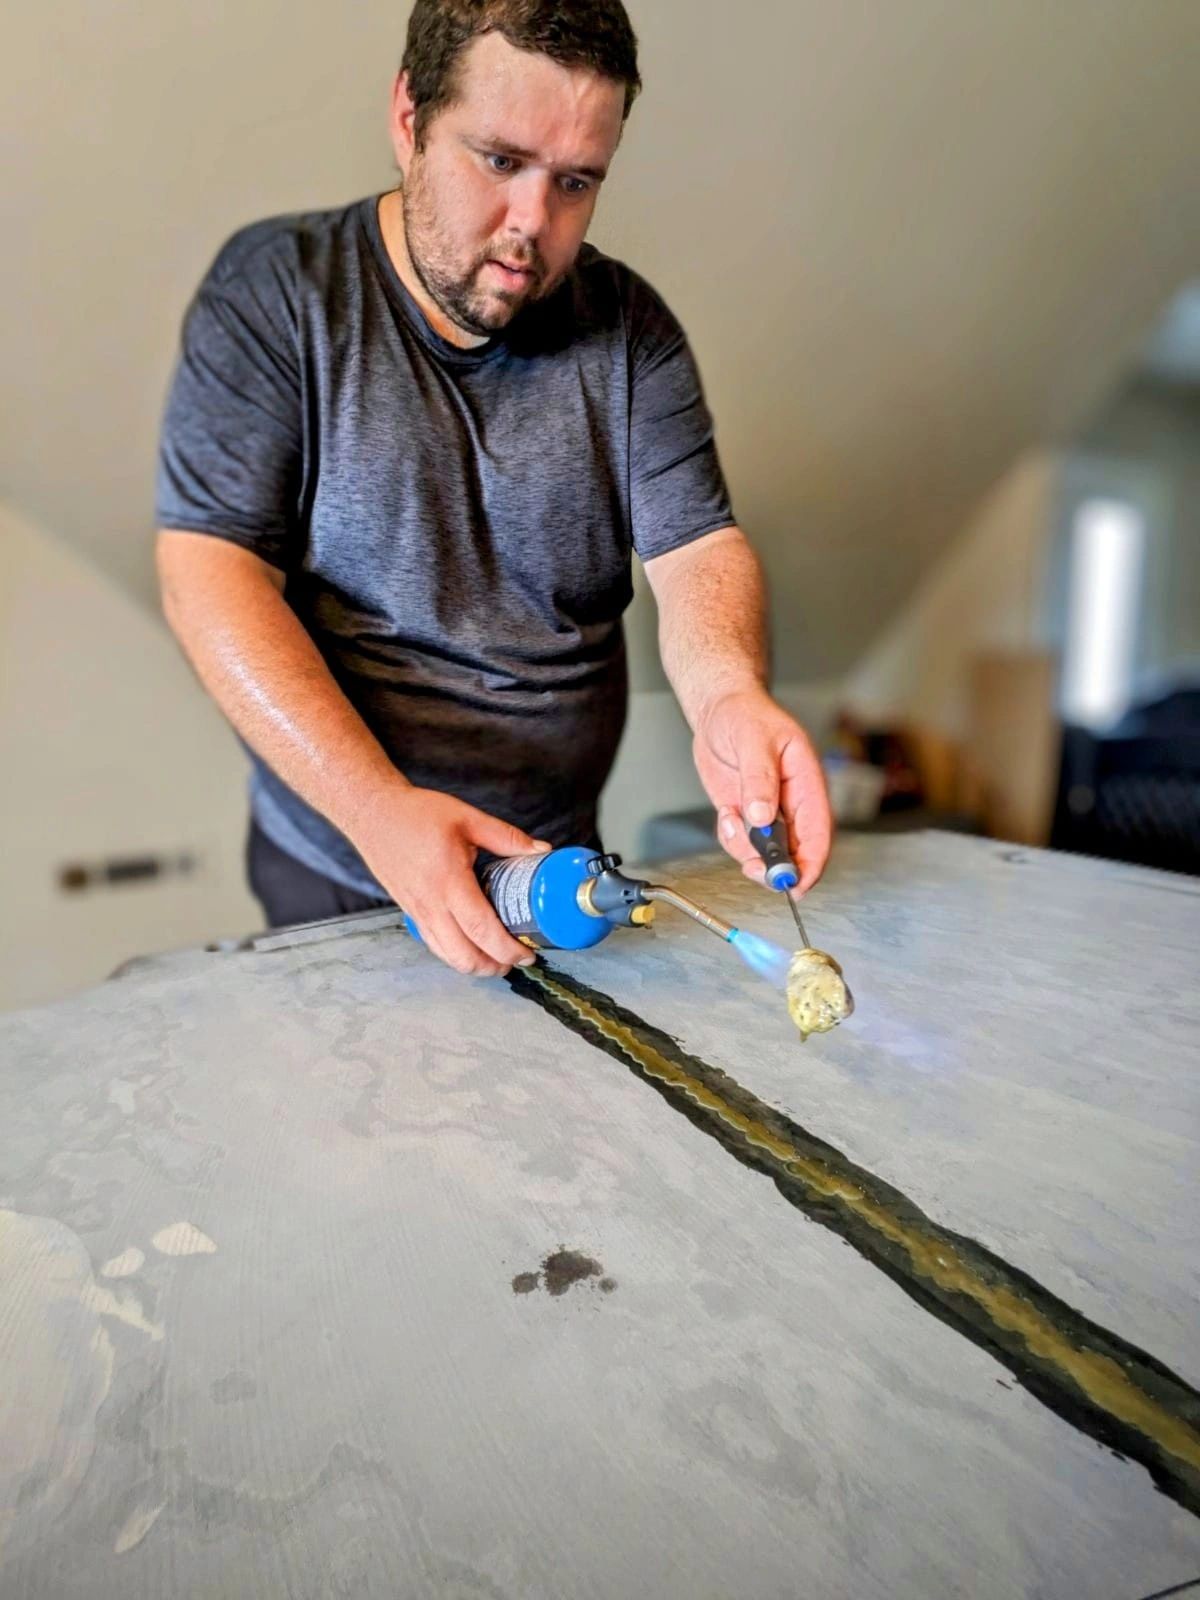
Step 7 – Reinstall the slate(s) and wax it over. After some more heavy lifting and getting the slate(s) back onto the frame, it’s time for fine-tuning. Each slate has to be lined up perfectly where it rests on the frame. We get it as close as possible and then use a small screwdriver to poke down into one of the preset holes to keep it in place, then grab the screws and drill them in. Once each slate is secured to the frame, check each “seam” to see if it’s level. You’ll want to get them as close as possible, occasionally a slate may need a shim to get squared up evenly with its adjoining slate. After this is completed, it’s waxing time. Natural beeswax is the way to go, anything else is whack (some service providers use bondo-type fillers, we don’t like that). Use a torch to heat the wax and melt it over the seams, thereby filling the small gap in the seam. Then take a putty knife and run it down the seam, scraping off the excess wax. Repeat this process as needed until the seam is completely filled, smooth, and level. On some pool tables, you’ll need to do this with the preset holes as well. If they are set within the playing area, fill them with wax then scrape and smooth. Make sure the entire surface is clean and clear of any debris before proceeding!
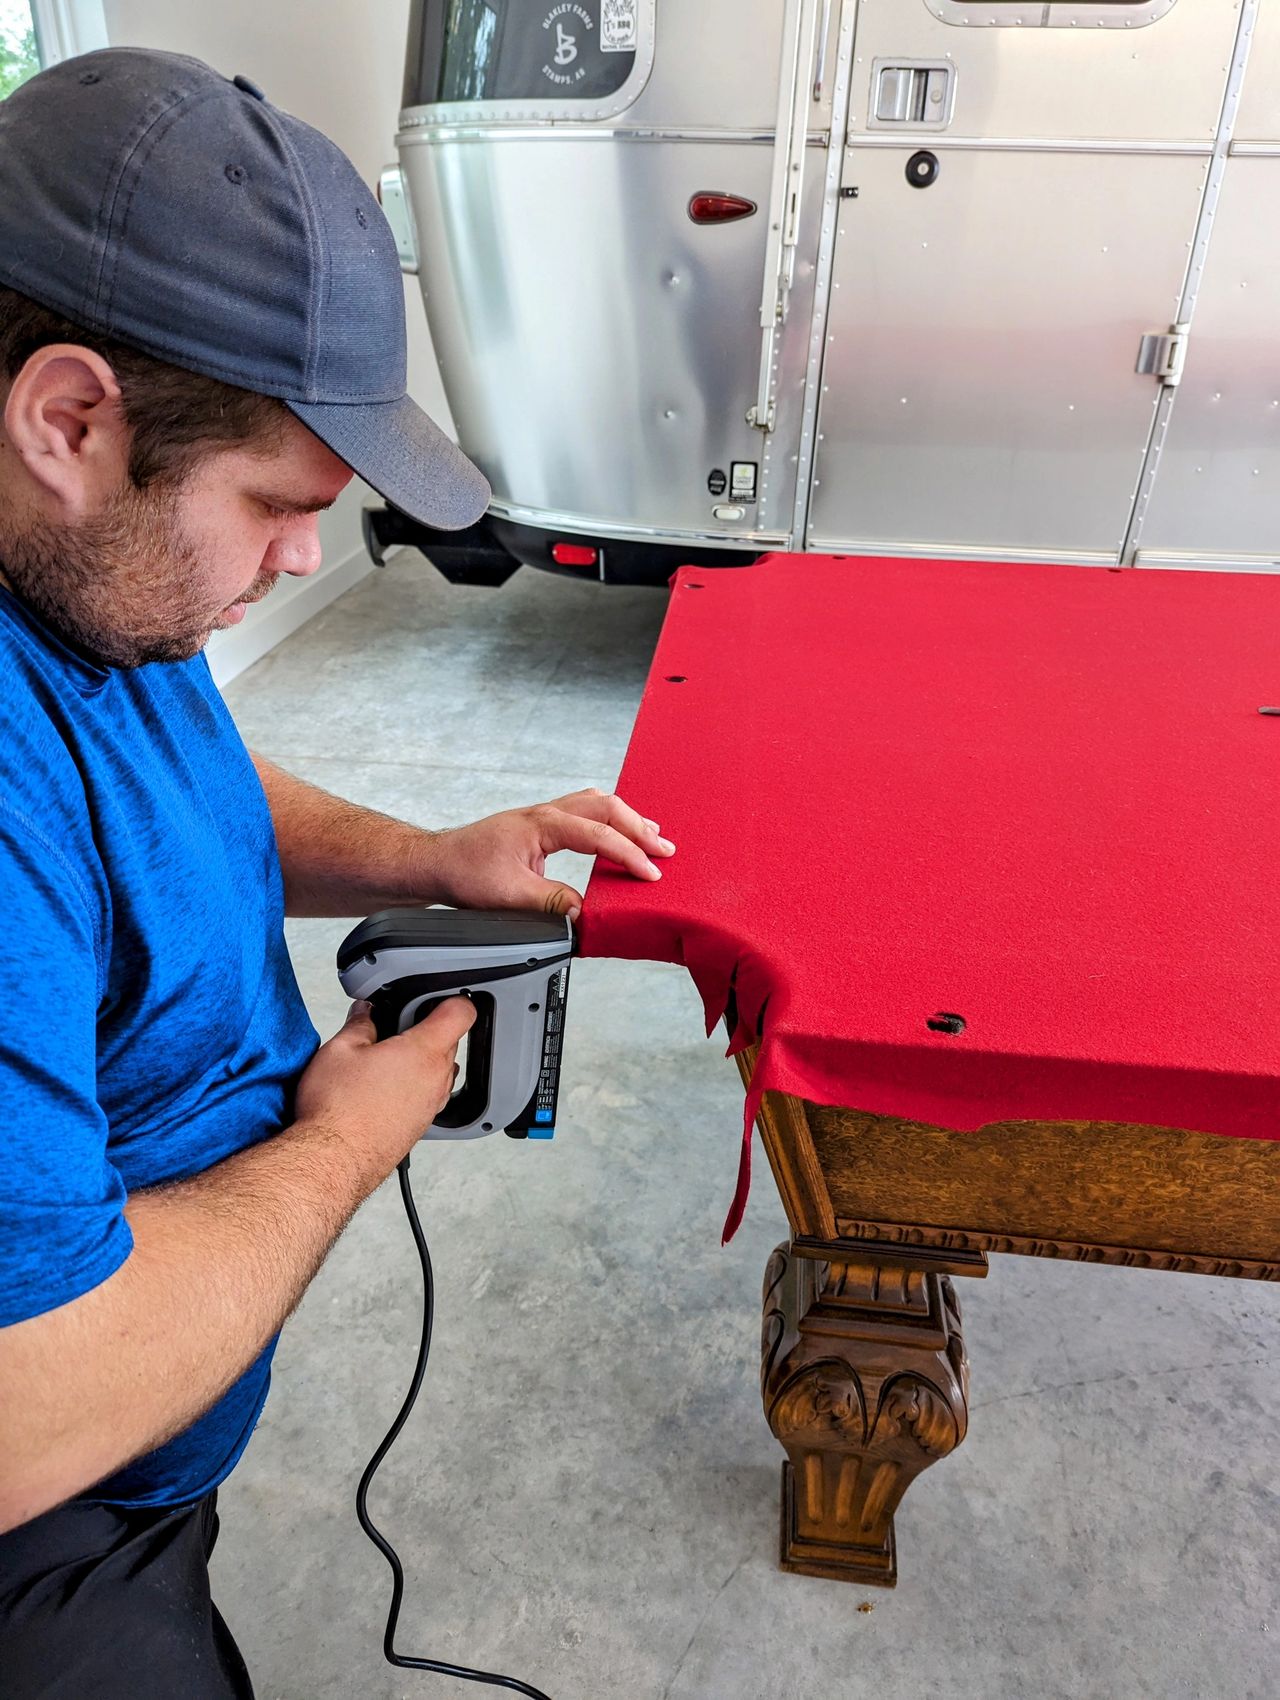
Step 8 – Place and secure the felt. Roll the felt out on the slate top. Once it’s positioned, we always start end to end instead of side to side. Spray adhesive glue on the outer edge of the slate, then pull and stretch the felt into the position it held previously (you can see the creased lines). Repeat this on the other end, then the sides. Double-check that the felt is smooth and wrinkle-free across the entire surface, then it’s time to staple. An electric staple gun is a lifesaver here because you have to go around the entire table! The pockets will have several flaps, ensure that these are secured up and under well, there can’t be any loose or hanging portions.
Step 9 – Place and secure the rails/bumpers. Lay each rail place out and get it connected at its spot at the table. When reconnecting, be sure that you don’t get the leather flaps from the pockets hung up anywhere. Install all hardware and staple the pocket’s excess flaps if required.
Step 10 – Final Touches. Scan over and make sure everything is tightened up and in place, then do a final check that the pool table is level. You may need to shim under the legs to level it out. Once complete, get the balls back on and it’s ready to play!
Our charges for a full-service pool table move begin at $500, contact us to learn more if you need one moved in Northwest Arkansas!
Here’s a quick playthrough of the process: